I bought a nice laptop that will end up going to college with my son.
Here are a few of the features of the Alienware m17 R5 AMD:
- CPU: AMD Ryzen (TM) 9 6900HX (8-Core /16 Thread, 20MB Cache, up to 4.9 GHz max boost)
- RAM: 32 GB (2) 16 GB DIMM, DDR5
- Video: AMD Radeon (TM) RX 6850M XT 12 GB GDDR6
- Hard Drive: 1TB M.2 PCIe NVMe Solid State Drive
The specifications are good except for the Hard Drive which is puny by today’s standards. I decided to upgrade it. The laptop motherboard supports the 4th generation NVMe type hard drives. These little guys are smaller than a stick of Wrigley’s chewing gum, measuring about three inches long by one inch wide and about as thick as a nickel.

They are 48 times as fast as a standard mechanical hard drive. What’s the old saying about dynamite and small packages?
Anyway, what I discovered is that the laptop will support two hard drives; however, the documentation says that drive one can be up to 4 TB while the second drive can only be 2 TB. As a result, I opted to get a 4 TB drive by Western Digital. I bought it on Amazon before I got too mad at them for not refunding the money I had spent on my electric razor—which by the way has still not been refunded yet.

WD_BLACK 4TB SN850X NVMe Internal Gaming SSD Solid State Drive – Gen4 PCIe, M.2 2280, Up to 7,300 MB/s – WDS400T2X0E
M.2 is the slot size on the motherboard and 2280 is the size of the hard drive circuit board.
These drives cost over $1,200 from Dell but are $399.99 from Amazon and Newegg and similar places.
What I am slowly learning is buy lower specifications from Dell and then upgrade them to your heart’s delight. At least with their Alienware computers, upgrading them yourself does not void the manufacturer warrant.
One purpose of this blog is to document a few things missing in many of the instructions-written or on video—that are necessary to do this upgrade.
One reason to get the Western Digital drive is for the software. Which I will start to explain now.
Before upgrading the drive, it needs to be cloned otherwise you will need to do a full install of Windows and all other software. Alienware software is a royal pain to install.
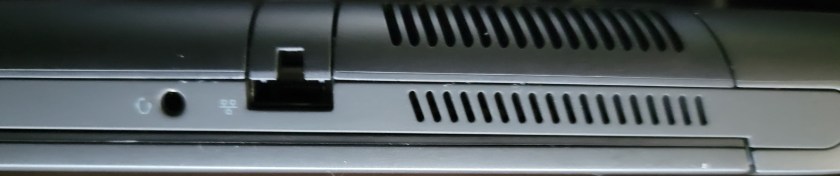
Western Digital provides a free copy of Acronis software, the caveat of course is that it can detect at least one Western Digital drive in the computer. As a result, you need an enclosure to house your M.2 drive so it can be cloned. The one I bought connects via USB-C. There just so happens to be a USB-C port on the back of the Alienware PC. Once attached, you must partition or initialize the drive and/or format it.

Then install the Acronis software and clone the drive. In my case, this took about 8 minutes to clone the 1 TB drive. (Please note that my drive was not full so your mileage may vary.) Then shut off the computer.
One of the unique things about this laptop is that it never truly shuts off. Furthermore, the battery is not removable.
In the old days, you typically just opened a small cover on the bottom of a laptop to upgrade RAM or hard drives. These designs often had a quick release to remove the battery. Neither is the case with the Alienware laptop. No, you have to remove the entire bottom of the laptop.
Please note when doing this that many of the screws remain attached to the bottom cover and are not fully removed from the cover.
Second, the cover will not willingly come off once screws are removed.
When working on the laptop, I had the vented area at the bottom and the area near the touch pad at the top. There are eight screws that must be loosened. Four across the top, two in the middle, and two on the bottom. Circled in red in my photos.

Screws 1, 4, 5, and 6 will loosen but not be removed from the cover while screws 2, 3, 7, and 8 will come completely out.
At this point the cover will still not come loose. This next step is not shown on videos or in written instructions. You need a small flat head or standard jeweler sized screw driver. You must gently separate the cover from the rest of the laptop.
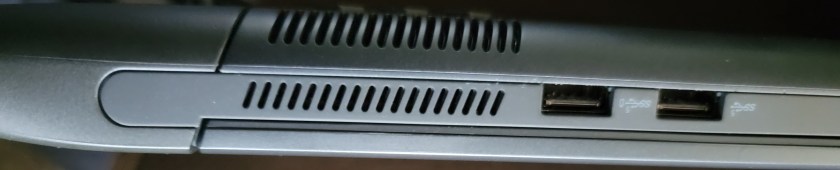
Be gentle or you will scratch the plastic cover. Start on the sides near the openings for USB or HDMI cables. Once these begin to separate work in both directions until cover is loose. Again, be gentle. You only need the halves to separate slightly. Once you have worked all the way around the outside edges of the cover, pull and it should come apart.
Once cover is off, gentle disconnect the battery from the motherboard. This connector (labelled MB) is circled in green. It slides toward battery to remove. Failure to do this step may result in destroying the hard drive or other components in the computer.

Oh, another undocumented thing is that both M.2 slots come with their own heatsink. So don’t fret about buying one either with the drive (only available for 2 TB model) or from a third party vendor.
The drive slot on the right is the C Drive. Again, the new drive can be up to 4 TB.

Remove the cloned drive from the enclosure and replace the factory drive with your new one.
Due to the heatsink, you must remove two screws instead of the customary one on the NVMe M.2 drive. Seat the drive and replace the screws.
Reconnect the battery and then close the cover.
When booting the new drive, I was taken to the BIOS program and asked to set the time before it would boot. After that it should behave normally.
Lastly, Western Digital also has another program (Western Digital Dashboard) that you can install to help with the drive once it is running. I recommend installing that.